

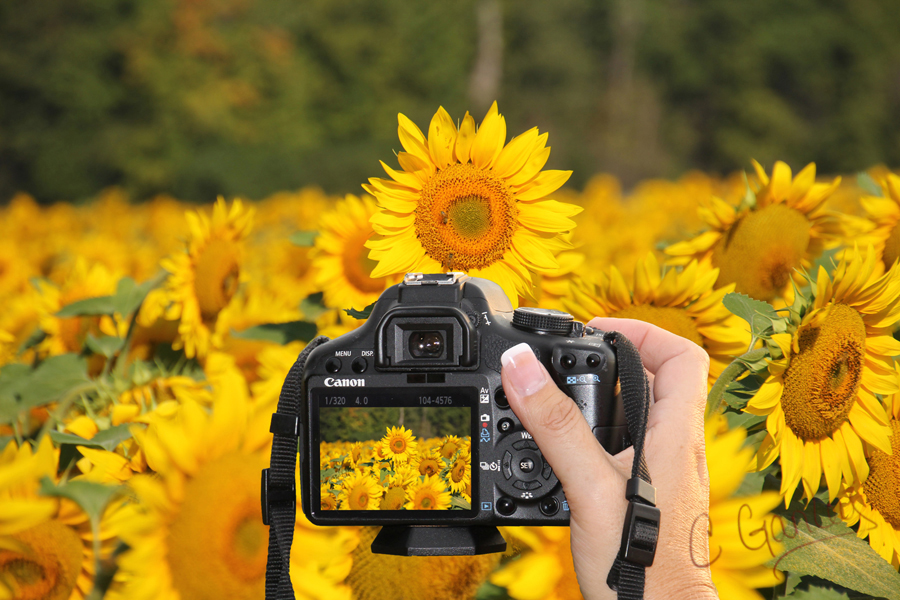
Camera Basics
Photography has become a fun and rewarding hobby for many people with the introduction of the digital camera. With film and processing costs no longer factors, people can point and shoot...... and with the ease of the 'Auto' setting, nearly anyone with a reasonably steady hand and a creative eye can get fairly good results. But, if you're ready to move beyond good and start taking great photos - you know the ones........the images that make you stop and stare and wonder how'd they do that?', the images with vibrant, true to life color, the images that have sharp and crisp edges without noise and graininess, the images that pop off the page......then you're ready to move your dial off the 'Auto' setting.
What message is the 'Auto' command selection sending to your camera? It's telling your camera to make all the decisions regarding the shot you're about to take beyond what's visible in the viewer. Basically your camera decides everything including:
- - how much light is in your scene
- - how fast or slow to shoot
- - how much noise to allow
- - how much of your image to keep in focus
- - where your focus point is
- - what the light temperature of your scene is
The only thing you decide is where to point and when to click.
When you lift your camera and press the shutter release button, your camera makes a number of decisions. It takes a reading of the lighting present in your scene and determines the best settings for shutter speed, aperture (how much light to allow in), and the sensitivity to the light on the camera's sensor. It also decides the temperature of the light (warm, cool, etc.), makes the selection of what will be in focus and what will not, and how much of your image will be in focus.
If you're ready to start taking more creative control over the images you produce, then you're ready to learn about the exposure triangle.

There is no right or wrong combination of the 3 elements, but balance your triangle and get great results.
Shutter Speed
Measured in fractions of seconds, shutter speed determines the length of time that light is allowed to pass through the lens to the camera's sensor (the processor where your image is captured). Think of the shutter as your camera's eye. It can open and close very quickly or stay open for a long time. Shutter speed is a function of the camera and most DSLR cameras have shutter speeds that range from 30 seconds to 1/8000th of a second.
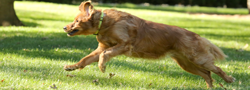
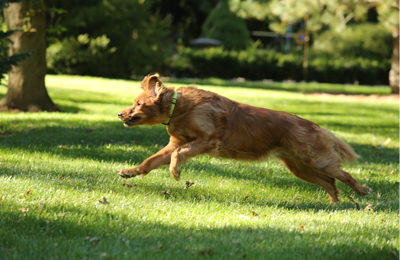
Shutter speed was the priority when determining the triangle components for this image. A fast shutter speed of 1/1250th was needed to freeze the action of this sprinting Golden.
Shutter Speed
Although it was a bright and sunny day, this image was taken in a fairly heavily shaded area, so once the shutter speed was determined for capturing the movement, ISO and aperture had to be adjusted to achieve a well balanced image.
Shutter speed is a function of the camera and most DSLR cameras generally range from 30 seconds to 1/8000th of a second. Shutter speeds are shown as a fraction of a second or as a second. On your display, a shutter speed of 1/250th will be displayed as 250 while a shutter speed of 2 seconds will be displayed with quotes as 2". In terms of fractions of a second, the higher the denominator, the faster the shutter speed. So, if you wish to stop the motion of a speeding train, a racing thoroughbred, or a star player's layup, will you want a fast shutter speed and a higher denominator. For example: 1/1000th
If your subject is still, such as a bowl of fruit, a slower shutter speed (smaller denominator) will do just fine. For example: 1/60th.
Shutter speeds under about 1/60th of second usually require the use of a tripod to obtain clear, crisp images.
 ×
×
Aperture
Measured in "f-stops", aperture measures depth of field as well as the amount of light that passes through the camera to its sensor. Think of aperture as a constricting and dilating pupil in response to the light that it is being exposed to. Aperture can be set wide to allow in a lot of light or narrow to allow very little light to pass through to the sensor. Aperture ranges are controlled by the lens rather than the camera body.

In this low light auditorium, a wide aperture of f/2.8 was needed along with a high ISO to compensate for the lack of light in this scene. These dancers also require a faster shutter speed to capture their movement and avoid blurring.
Click Here For More Information
Aperture
Aperture is specific to each lens and not all lenses have the 2.8 setting available. Some lenses have a fixed aperture (for instance f/1.4 or f/2.8) while others have a range (perhaps f/3.5 - f/6.3). A wide aperture indicates 2 things. It tells the camera to allow in a lot of light. This is particularly helpful if your scene is poorly lit. A wide aperture (indicated by a lower/smaller number such as f/2.8, f/3.5, f/4.0, etc.) also indicates a shallow depth of field. This tells your camera to keep the main subject in focus and blur the background and foreground. A shallow depth of field is generally the desired result for portraits and macro photography.
A narrow aperture (indicated by a higher/larger number such as f/11, f/16, or even f/32) indicates a deep depth of field, one that keeps nearly everything in focus. Photographers shooting landscapes generally desire this result.
 ×
×
ISO
Considered the equivalent to film speed, ISO controls the camera's sensitivity to light. Cameras vary, but the typical range found on most includes ISO of 100 to 3200. A lower ISO means that the camera's sensor is less sensitive to light therefore requiring a well lit setting to capture a nicely balanced image. A high ISO compensates for low light situations, but may result in digital noise (aka graininess) in your image.
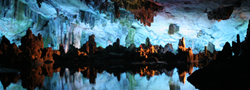
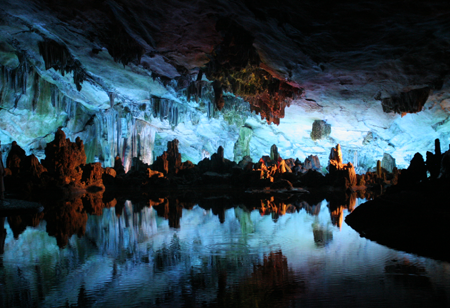
This very dark cave required an ISO of 1600 for proper exposure. A very slow shutter speed was required and no tripod was available, not even a level flat surface, so this image was shot hand held at 1/25th.
Click Here For More Information
ISO
In the day of film shooting, you purchased your film based on how you planned to use it. A film speed of 800 might mean that you would be shooting an indoor poorly lit birthday party, while 200 speed film might indicate shooting an outdoor day at the zoo. I'm glad those days are behind us. Now we can change our ISO setting for every photo we take. What a relief.
A general guideline of where to start with your ISO setting:
Low ISO==> 100 - 200: a bright, sunny day or well lit indoor environment.
Medium ISO==> 250 - 800: indoors with adequate but not bright lighting or outdoors when skies are cloudy or just before sunset.
High ISO==> 800+: low light scenes where shooting in this range is a last resort. Remember the trade-off to a high ISO may be a grainy image with irreparable digital noise.
 ×
×
Getting it Right
So, now that you know what the components of the exposure triangle are, we can start to experiment with how to balance them to achieve great images. Start by turning your camera's mode dial to "M" for manual. Don't be afraid to experiment with various compositions and exposures. Remember, film is cheap.
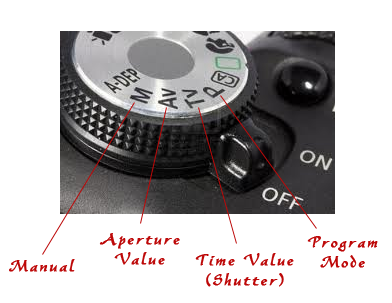
Full Manual Mode
When your camera is in manual mode, you have complete control over your exposure. You select the shutter speed, the aperture, the ISO, and all other components that help make your picture perfect.
By adjusting the elements in the exposure triangle, you control the amount of light that hits the sensor, the level or clarity, whether the exposure will be underexposed, overexposed, or nicely balanced, how much of your image is in focus, and a host of other variables. It may be necessary to make adjustments to one or more of these settings to slightly or maybe even greatly tweak the final outcome of your photo.
After some practice, this technique of choosing your initial starting settings and making adjustments will get easier.
Not Quite Ready for Full Manual?
Moving your dial off of Auto mode can be quite intimidating. Most people are more comfortable letting the camera make exposure decisions for them even though the results can be unpredictable or even disappointing. But, you at least have a picture, right? That's why many cameras never leave the Auto mode. It's kind of sad to think that people pay good money for their camera's features, but don't take advantage of most of them.
Most DSLR cameras have a few settings that fall somewhere between "Auto" and full "Manual". Each gives you different aspects of creative control over your picture taking. If you're not ready to tackle balancing shutter speed, aperture, and ISO all at once, you can choose one of the presets and pursue one mode at a time. This group of settings is often referred to as the Creative Zone and contains the following settings: manual, shutter priority, aperture priority, program mode, and bulb mode. Three of these creative zones are covered here.
Shutter Priority
The shutter priority mode allows you to set the shutter speed while directing your camera to make all other decisions. Some cameras will also let you change your ISO setting while in this mode. Check you user manual or experiment for yourself.
If your scene has movement in it, decide if you want to freeze the motion in time or if you want some blurring to show action. This will help you find a starting place for shutter speed.
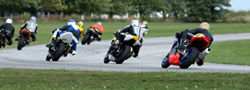
Shutter Priority
To freeze the action in this race, the shutter speed was set to 1/1600th of a second. It was a fairly overcast day, so the camera compensated for the fast shutter speed, which means not a lot of light has time to get in, by choosing a mid range ISO and a mid range aperture.
The shutter priority selection is usually indicated on the dial by the code 'Tv' or 's'. Don't be confused thinking that this setting may actually be a hook-up of some sort to your big screen tv. Sorry, but Tv stands for time value since shutter is responsible for the time element in the exposure triangle.
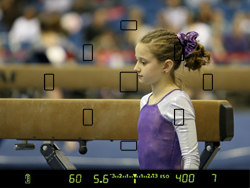
Occasionally you may choose a combination of shutter speed and ISO that make it impossible for your lens to create a suitable exposure based on the aperture values that are available on your lens. For instance, if your scene is a moderately lit indoor gym and you need a fast shutter speed to capture action but also want to choose a mid range ISO to avoid noise in your image, your camera will want to choose the widest aperture available. If your lens only supports a maximum aperture of f/3.5, your image will most likely be underexposed.
The more you practice with choosing your shutter speed, the more efficient and comfortable you will become. Trust me.
 ×
×
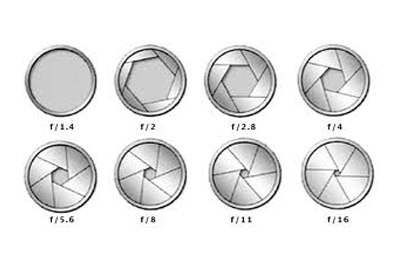
Aperture Priority
As you might have guessed by now, the aperture priority mode allows you to select the depth of field by choosing a wide or narrow opening in the lens while the camera makes other pertinent choices for your image. Check your manual to see what other selections you may be able to make in this mode.
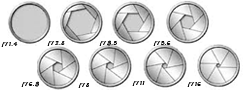
This image shows the lens openings at various f-stops or aperture settings. Since aperture is a function of the lens, the maximum aperture will be found on the barrel of the lens and will be written as the first or lower number. For instance, a lens that reads f/3.5 - 6.3 has a maximum aperture of f/3.5.
Click Here For More Information
Aperture Priority
Aperture priority may be labeled as A or Av (aperture value) on your dial. When you choose this option, you are assessing your lighting situation and asking the camera to choose a shutter speed based on your selection. You may be able to change the ISO, light sensitivity, while in Av mode.
In some situations, you may make choices that make it difficult for your camera to produce a good shot. For instance, if your scene is poorly lit and you choose a narrow aperture of f/8 and a mid range ISO of 400, your camera will be forced to choose a slow shutter speed that may require a tripod. If you don't have a flat surface to rest your camera on, you may wind up with a very blurry image.
As I mentioned earlier, maximum aperture is determined by the lens. A lens with a wide aperture of say f/1.4 or f/2.8 is considered to be a very fast lens. This is because these wide settings allow a lot of light to get in, thereby allowing a faster shutter speed.
 ×
×
Program Mode
Program mode most closely resembles auto mode. This setting allows you to ascertain the light sensitivity while your camera then chooses the shutter speed and aperture to best suit the brightness of your subject to achieve the desired result.

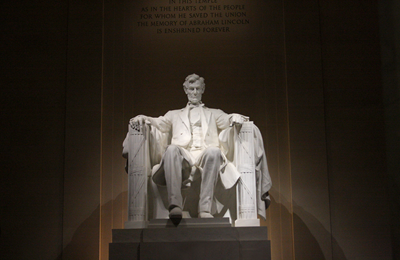
Viewing the Lincoln Memorial can be quite memorable, especially at night. Here the ISO was bumped up to 1600 to compensate for the dark sky and dimly lit monument. As a result, you will notice some graininess in the image. All good things in life have trade-offs.
Program Mode
Program mode will most likely be displayed on your dial as a P. With this setting you will choose the ISO that best suits your scene, but the camera will determine the shutter speed and aperture, without regard to the subject you are shooting (i.e. action, portrait, macro, etc.)
Program mode could be a good starting point if you are shooting in an unfamiliar environment such as darkness. If your lens does not have a particularly wide maximum aperture, your camera will choose a slower shutter speed indicating that you will need a tripod or at least a flat surface. The alternative is to choose a higher ISO.
If your scene is extremely dark and you have chosen a mid range ISO, your lens may not be able to accommodate your request for a properly exposed image because it does not have a wide enough aperture. It will most likely choose the maximum available which may still result in a dark (underexposed) image.
 ×
×
Scene Modes
Scene Modes are an extension of the Auto Mode. They allow you to instruct your camera to choose your settings based on what you intend to shoot. Suitable subjects for scene mode include: portrait, landscape, sports, macro, and night portrait.
Extras.......to improve your images
Three more fundamentals to help improve your photos - Metering, White Balance, and Histogram.
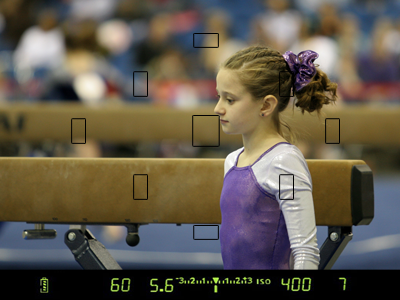
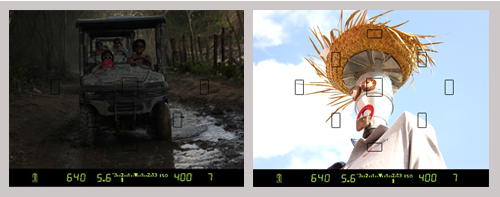
Metering
Inside you camera's viewer and probably also on your LCD panel or screen, you have a very helpful tool - a light meter. When you press your shutter release half way down, you will see this handy display light up in your viewer at the bottom of your picture. Light meters measure the light in your scene and offer you guidance about your exposure.
Keep in mind that the light meter takes an average of the light in your scene based on the metering mode you have selected or the mode that was selected for you by default. You do not always have to follow its recommendation. You are in control.
Metering
When you are in full manual mode, you will make your selections for shutter speed, aperture, and ISO, and the light meter will indicate how balanced your exposure will be based on the light in your scene. If the meter is happy with your selections, the indicator will be set in the middle or at zero.
If the indicator is not on the zero, it means that the light meter is predicting that your image may be under or over exposed and suggesting that you make changes to your settings. If the indicator is on the negative or left side, the exposure may be too dark, and you may need to roll your dial to the left until the indicator is in or near the middle. If the indicator is on the positive or right side, the exposure may be too bright, and you may need to roll your dial to the right until the indicator is in or near the middle.
The more you use the light meter the more comfortable you will become. Remember, the meter is a guide and not a rule. The meter doesn't know what kind of creative angle you're after.
 ×
×
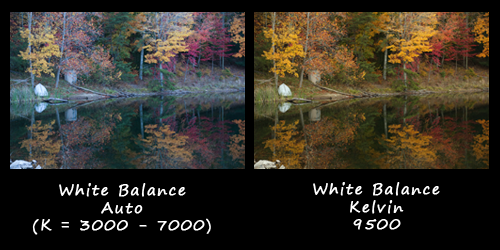
White Balance
White balance is a system within your camera that helps it differentiate between color temperatures. Colors are measured on a color temperature scale and are expressed in degrees Kelvin (K). Warmer colors are red, yellow, and orange while cooler colors are purple, blue, and green. Digital cameras allow you to choose a white balance setting based on the lighting conditions.
Today's DSLRs have several white balance presets to help you choose a setting that will result in the most acurate true to life colors. Check your manual to see what's available on your camera.
White Balance
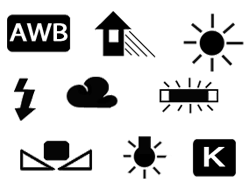
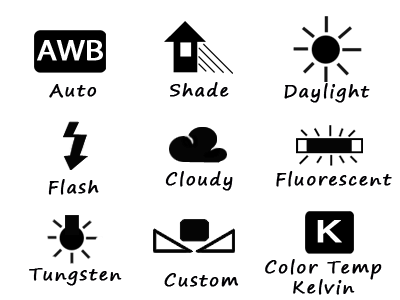
You may find the white balance presets in the camera's menu system. For added convenience, some cameras have a designated button near the LCD screen for easy access. Most cameras have at least the following presets: auto, daylight/sun, cloudy, shady, flash, fluorescent, and tungsten. Higher end cameras may have a custom setting that you preset or a Kelvin setting.
Some cameras offer an advanced setting that allows you to choose a specific color temperature using the Kelvin scale between the range of about 2500 and 10,000.
Just like the components of the exposure triangle, the more you practice with the white balance settings, the easier they will become. These 2 images were taken within a minute of each other. You can see the drastic difference white balance can have in your final result. It often makes a difference between 'WOW' and delete.
 ×
×
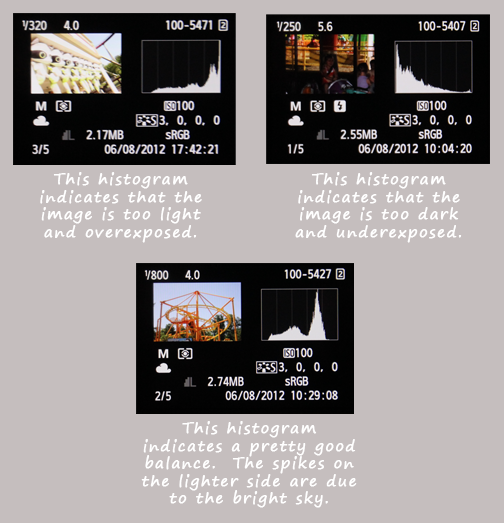
Histogram
You are probably already in the habit of checking your images on the LCD screen after you shoot them. You may also want to get in the habit of checking the histogram. 'The what?' you might be thinking. This view lets you see where the pixels were recorded for the tonal range and if the image is over or under exposed.
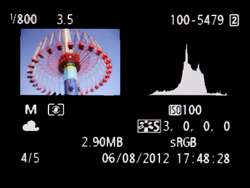
You should be able to find a view similar to this by pressing the info or display button a few times once you have your image in the LCD display. You will also find exposure information here.
Click Here For More Information
Histogram
If you have too many pixels grouped at one end or the other of your histogram, your image may be over or under exposed. Generally a balanced image will have its pixels evenly distributed across the histogram. There are, of course, exceptions.
The histogram view gives you a lot of valuable information regarding your photo with just a couple of clicks. You can quickly see your shutter speed, aperture, ISO, quality and size, date and time, white balance, etc.
 ×
×